A basic After Effects workflow follows six steps: importing and organizing footage, creating compositions and arranging layers, adding effects, animating elements, previewing your work, and rendering and outputting the final composition so that it can be viewed by others. In this lesson, you will create a simple animated video using this workflow, and along the way, you’ll learn your way around the After Effects interface.
First, you’ll preview the final movie to see what you’ll create in this lesson.
- Make sure the following files are in the Lessons/Lesson01 folder on your hard disk, or download them from peachpit.com now:
- In the Assets folder: movement.mp3, swimming_dog.mp4, title.psd
- In the Sample_Movie folder: Lesson01.mp4
- Open and play the Lesson01.mp4 sample movie in Windows Movies & TV or QuickTime Player to see what you will create in this lesson. When you are done, close Windows Movies & TV or QuickTime Player. You may delete the sample movies from your hard disk if you have limited storage space.
Creating a project and importing footage
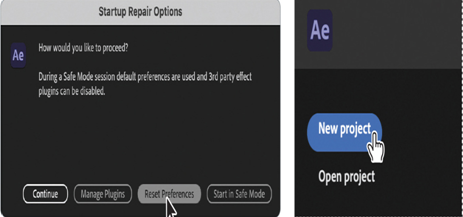
When you begin each lesson of this book, it’s a good idea to restore the default preferences for After Effects so that your experience matches the descriptions and images in the book. (For more information, see “Restoring default preferences” on page 3.) You can do this with a simple keyboard shortcut.
Tip
Restoring default preferences can be tricky in Windows, especially if you’re working on a fast system. Press the keys after you double-click the application icon but before After Effects begins to list the files it’s activating. Alterna-tively, you can choose Edit > Sync Settings > Clear Settings, and then restart the application.
- Start After Effects, and then immediately hold down Ctrl+Alt+Shift (Windows) or Command+Option+Shift (macOS) to restore default preferences settings. In the Startup Repair Options dialog box, click Reset Preferences.
The Home window opens. It provides easy access to your recent After Effects projects, as well as to tutorials and more information about After Effects.
2. Click New Project in the Home window.
After Effects displays an empty, untitled project.
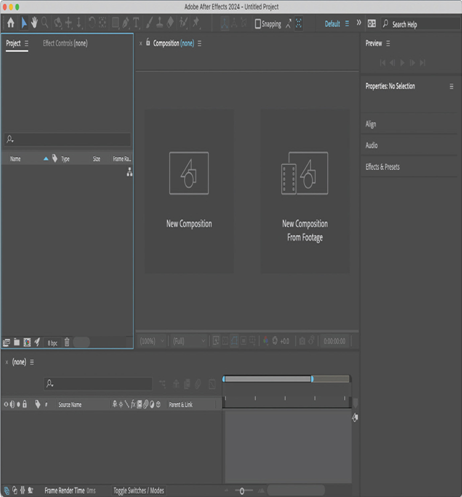
An After Effects project is a single file that stores references to all the footage you use in that project. It also contains compositions, which are the individual containers used to combine footage, apply effects, and, ultimately, drive the output.
Tip
To quickly maximize a panel, double-click the panel tab. To return it to its original size, double-click the tab again.
When you begin a project, often the first thing you’ll do is add footage to it.
- Choose File > Import > File.
- Navigate to the Assets folder in your Lessons/Lesson01 folder. Shift-click to select the movement.mp3 and swimming_dog.mp4 files. Then click Import or Open.
Note
If the files aren’t next to each other, Control-click (Windows) or Command-click (macOS) to select them. Do not select the title.psd file.
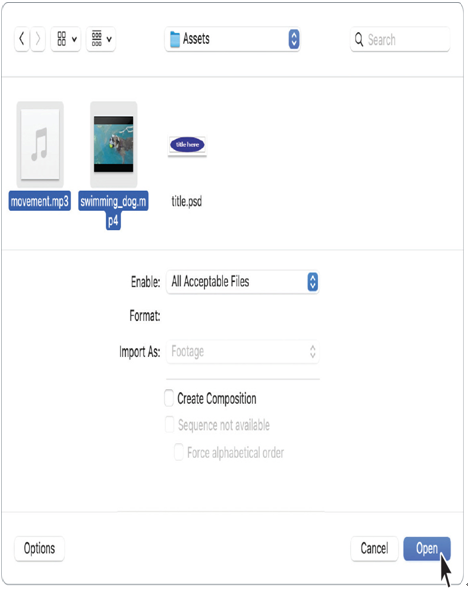
A footage item is the basic unit in an After Effects project. You can import many types of footage items, including moving-image files, still-image files, still-image sequences, audio files, layered files from Adobe Photoshop and Adobe Illustrator, other After Effects projects, and projects created in Adobe Premiere® Pro. You can import footage items at any time.