Use the Timeline panel to animate layer properties and set In and Out points for a layer. (In and Out points are the points at which a layer begins and ends in the composition.) Many of the Timeline panel controls are organized in columns of related functions. By default, the Timeline panel contains a number of columns and controls, as shown here:
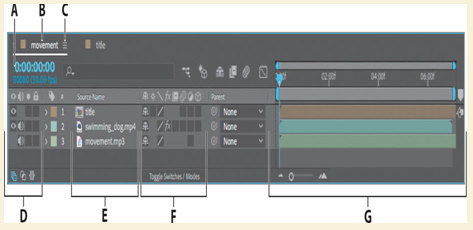
A. Current time
B. Composition name
C. Timeline panel menu
D. Audio/Video Switches column
E. Source Name/Layer Name column
F. Layer switches
G. Time graph/Graph Editor area
Understanding the time graph
The time graph portion of the Timeline panel (the right side) contains a time ruler, markers to indicate specific times, and duration bars for the layers in your composition.
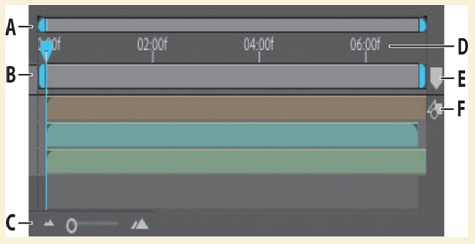
A. Time navigator start and end brackets B. Work area start and end brackets C. Time zoom slider D. Time ruler E. Composition marker bin F. Composition button
Before delving too deeply into animation, it will help to understand at least some of these controls. The duration of a composition, a layer, or a footage item is represented visually in the time graph. On the time ruler, the current-time indicator marks the frame you are viewing or editing, and the frame appears in the Composition panel.
The work area start and end brackets indicate the part of the composition that will be rendered for previews or final output. When you work on a composition, you may want to render only a portion of it by specifying a segment of the composition time ruler as a work area.
A composition’s current time appears in the upper left corner of the Timeline panel. To move to a different time, drag the current-time indicator in the time ruler—or click the current-time field in the Timeline panel or Composition panel, type a new time, and press Enter or Return, or click OK.
For more information about the Timeline panel, see After Effects Help.