Lesson overview
In this lesson, you’ll learn how to do the following:
- Create a project and import footage.
- Create compositions and arrange layers.
- Navigate the Adobe After Effects interface.
- Use the Project, Composition, and Timeline panels.
- Transform layer properties.
- Use the Properties panel.
- Apply basic effects.
- Create keyframes.
- Preview your work.
- Customize the workspace.
- Adjust preferences related to the user interface.
- Find additional resources for using After Effects.
This lesson will take about an hour to complete. If you haven’t already done so, download the project files for this lesson from peachpit.com/AfterEffectsCIB2024, following the instructions in the Getting Started section under “Accessing the lesson files and Web Edition.”

PROJECT: TITLE SEQUENCE
Whether you use After Effects to animate a simple video title sequence or to create complex special effects, you generally follow the same basic workflow. The After Effects interface facilitates your work and adapts to each stage of production.
About the After Effects work area
After Effects offers a flexible, customizable work area. The main window of the program is called the application window. Panels are organized in this window in an arrangement called a workspace. The default workspace contains stacked panels as well as panels that stand alone, as shown below.
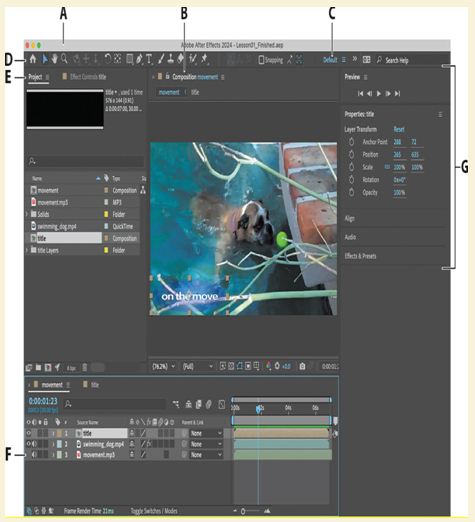
A. Application window B. Composition panel C. Workspace bar D. Tools panel E. Project panel F. Timeline panel G. Stacked panels
You customize a workspace by dragging the panels into the configuration that best suits your working style. You can drag panels to new locations, change the order of stacked panels, move panels into or out of a group, place panels alongside each other, stack panels, and undock a panel so that it floats in a new window above the application window. As you rearrange panels, the other panels resize automatically to fit the window.
When you drag a panel by its tab to relocate it, the area where you can drop it—called a drop zone—becomes highlighted. The drop zone determines where and how the panel is inserted into the workspace. Dragging a panel to a drop zone either docks it, groups it, or stacks it.
If you drop a panel along the edge of another panel, group, or window, it will dock next to the existing group, resizing all groups to accommodate the new panel.
If you drop a panel in the middle of another panel or group, or along the tab area of a panel, it will be added to the existing group and be placed at the top of the stack. Grouping a panel does not resize other groups.
You can also open a panel in a floating window. To do so, select the panel, and then choose Undock Panel or Undock Frame from the panel menu. Or, drag the panel or group outside the application window.